Background
Nisus Writer Express v. 2.x is still full of bugs, very unstable and very heavy when handling large documents (I write this in January 2005; NWE is at its version 2.1.1). Nevertheless, it has some good new features: especially it supports style sheets, and footnotes/endnotes. But the import of Classic Nisus files is buggy, and many font or style settings have to be corrected manually. Using the rtf filter in exporting Classic Nisus files allows to achieve a better result, but still the styles are lost in the process. This is why I developed another exporting method which will generate rtf files with style sheets from tagged Classic Nisus files. The use of this system is not very easy; in the current state, some settings are for my personal use only (for example fonts, language setting, etc.), not common enough to be shared. However, I think this system is worth being known widely, so people can customize it for their own personal use or extend it for a wider use.The idea is to generate an rtf file from scratch. An rtf file consists mainly of two parts:
1. what can be called the rtf header, which defines the document as a whole;
2. what can be called the data part, containing the data of the document.The rtf format is a very flexible format, and may be different depending on applications. I think the only application that should support all the rtf specs is the latest version of MS Word (for Windows?). See the rtf format.
In the case of NWE's rtf files, the "rtf header" contains a "font table", defining all the fonts used in the document, a "color table" listing the colors used in the document, a "stylesheet table" listing different styles (paragraph styles and character styles) used in the document, and what is called "document formatting properties", specifying the attributes of the document such as margins and footer and header placement. After that comes the part containing data for the header and the footer.
In my system, I generate the font table and the stylesheet table for paragraph styles; each paragraph of the text to be converted is tagged with the paragraph style name, so that all the paragraphs of the converted document will be governed by defined paragraph styles. As to character styles, such as italic, bold, or some colors (red, green, blue), etc., they will be tagged, and will be converted to corresponding rtf commands (controle words). Thus, most of the styles in the original document will be preserved in the converted document.
Classic Nisus macro
First, we must add tags to the file to be converted. The tags describe the document's style attributes. In order to automate the task as far as possible, we will use several macros. But before that, we should make sure that every paragraph of the document is governed by a named paragraph style (in Classic Nisus terminology, it is called "named ruler").Here is an example of the tagged file:
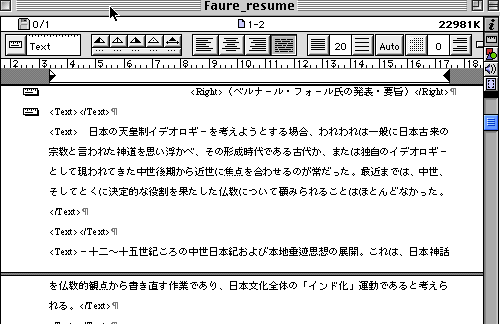
As you see, we have the icon of a named ruler at the first paragraph in the image (that ruler is named "Right", so we have the tag <Right>), and after the second paragraph, the paragraphs are governed by another named ruler, named "Text". Even an empty paragraph is tagged (e.g. the second paragraph in the image). As the image shows, it is not necessary that every paragraph has an icon of a named ruler.
The macros must be executed in a certain order. First, one will add tags to character styles, then paragraph styles. But if the document contains footnotes or endnotes, they must be taggged before any other tags.
Here are the macros:
0-Footnotes->tagEndNotesIf the document contains footnotes or endnotes, run first this macro. It will place the notes at the end of the main text; each note will be enclosed between the tag"<fn>"and"</fn>"(the same tag is used for footnotes and endnotes). In the main text, the note numbers will be replaced with"<fn></fn>".
Warning: After having run this macro, you should look at again to the "named rulers", at the beginning of the notes which are at the end of the main text. Make sure that the notes are governed by appropriate named ruler. If the notes have no named ruler, create one at this step.
1color_tagThis macro will replace texts in red characters with<red>xxx</red>, texts in green characters with<green>xxx</green>, texts in blue characters with<blue>xxx</blue>. Note that all the other character colors will be ignored. This macro works on a selection. If there is no selection, all the text will be selected, and will be tagged.
1fontSize_automaticThis macro will replace texts in different font sizes (9, 10, 14, 18 and 24 points) with<font size=yy>xxx</font>. Note that all the other font sizes will be ignored. This macro works on a selection. If there is no selection, all the text will be selected, and will be tagged.
1italic-bold_etc_tagThis macro will replace texts in different styles (italic, bold, underlinesuperscript, subscript and strike through) with<i>xxx</i>,<b>xxx</b>,<u>xxx</u>,<sup>xxx</sup>,<sub>xxx</sub>and<strike>xxx</strike>. Note that all the other styles will be ignored. This macro works on a selection. If there is no selection, all the text will be selected, and will be tagged.Now, the second group of macros are related to languages. Of course, you can omit using these macros.
2English_tag_selThis macro works on a selection. If there is no selection, it will quit. It will replace the selected text with<lang="english">xxx</lang>. The selected text must be in a Roman font.
2French_tag_selThis macro works on a selection. If there is no selection, it will quit. It will replace the selected text with<lang="french">xxx</lang>. The selected text must be in a Roman font.
2Japanese_tag_selThis macro works on a selection. If there is no selection, all the text will be selected and will be tagged. It will replace the selected text with<lang="japanese">xxx</lang>. The selected text must be in a Japanese font.
2Transliteration_tag_sellThis macro works on a selection. If there is no selection, it will quit. It will replace the selected text with<lang="transliteration">xxx</lang>. The selected text must be in a Roman font. -- The language "Transliteration" is a special language setting that I added in my Nisus Writer Express Languege Preferences. It is based on US English, no spell checking, and uses the keyboard layout AsianExtended.
2Tr_Chinese_tag_selThis macro works on a selection. If there is no selection, it will quit. It will replace the selected text with<lang="traditional chinese">xxx</lang>. The selected text must be in a Traditional Chinese font.
2unicode_tag_allThis macro works on all the text. It will replace "U+1234" with"&U+1234;". This will be converted to Unicode characters with the Perl script (see below).The third group includes only one macro:
3ITimesSkRom2HtmlEntityIf you use a special diacritical font for transliteration, or if you use "higher ASCII" characters (accented characters) in your document, you will have to run a macro to convert all the non-(lower-)ASCII characters into HTML entities. The macroITimesSkRom2HtmlEntityis only one of these macros. You will find other macros of the same kind in my another page East Asian Diacritical Fonts and Unicode. Please use the appropriate macro at this step.The fourth group includes two macros:
4paragr_tagThis is the most important (and complicated) macro. It may take a long time to execute if the document is long. It will enclose every paragraph with a tag of the name of the named ruler governing that paragraph (you have seen above the image of an example). When it finishes putting paragraph style tags, it will add at the beginning of the file a list of fonts and another list of paragraph styles. These lists -- we will call them a "style template" -- will look like this:And a dialog appears, saying<font_language>
English: Gandhari Unicode
English: Gandhari Unicode Italic
English: Gandhari Unicode Bold
Japanese: Hiragino Mincho Pro W3
</font_language>
<styles>
<Title>: font: , size: pt, color: , alignment: , space before: pt, space after: pt, space between lines: pt, left indent: cm, right indent: cm, first line indent: cm, left tabs: , right tabs: cm, centered tabs: cm, decimal tabs: cm, lang:
<Right>: font: , size: pt, color: , alignment: , space before: pt, space after: pt, space between lines: pt, left indent: cm, right indent: cm, first line indent: cm, left tabs: , right tabs: cm, centered tabs: cm, decimal tabs: cm, lang:
<Text>: font: , size: pt, color: , alignment: , space before: pt, space after: pt, space between lines: pt, left indent: cm, right indent: cm, first line indent: cm, left tabs: , right tabs: cm, centered tabs: cm, decimal tabs: cm, lang:
</styles>
BEGIN:xxx
"Now, add <*> to the default style..."I will explain below what mean these lists, and what you will have to do with them.
By the way, if the document contains paragraphs which are not governed by a "named ruler", there will be an empty style name tag -- something like:
If you see such an empty tag, you will be able to find easily which paragraphs are without named ruler: you will search for paragraphs which are enclosed between empty tags<>: font: , size: pt, color: , alignment: , space before: pt, space after: pt, space between lines: pt, left indent: cm, right indent: cm, first line indent: cm, left tabs: , right tabs: cm, centered tabs: cm, decimal tabs: cm, lang:<>and</>. You can insert manually in the empty tags any paragraph style name that you want.
4setNoteTagsIf your document has footnotes/endnotes, you will have to run this macro, in order to set the tags "<fn>" and "</fn>" at the right places.
5Clear Invalid charactersBecause of a bug, Nisus Writer inserts in some cases (often in some global Find and Replace oparations...?) some controle characters (mainly decimal ASCII 3). There may be other controle characters also if the document contains automatic numbers, etc. This macro first convert "variable texts" (automatic numbers, etc.) to plain text, then deletes all the controle characters, which may cause problems in the Perl conversion script. You should run this macro each time after you have finished all the above macros.The remaining macros are not to be run at every conversion operation.
ex-fnote_to_enoteThis macro will replace every "<fn>" and "</fn>" with "<en>" and "</en>". Notes which are enclosed between "<en>" and "</en>" will be converted as endnotes by the Perl converting script.All the remaining macros will insert at the top of the document a font list and a paragraph style list (a "style template").
ex-style_template_englishThis macro insert at the top of the document an example of "style template" for a document written mainly in English.
ex-style_template_frenchThis macro insert at the top of the document an example of "style template" for a document written mainly in French.
ex-style_template_japThis macro insert at the top of the document an example of "style template" for a document written mainly in Japanese.
What is a "style template" and how to work with it
The "style template" consists of a list of all the fonts that will be used in the converted document, and a list of all the paragraph styles that will be used in that document. We have seen a blank "style template" above. Here is an example of a real (working) "style template":<font_language>
Japanese: Hiragino Mincho Pro W3
</font_language>
<styles>
<*Text>: font: Hiragino Mincho Pro W3, size: 10pt, color: none, alignment: justified, space before: 0pt, space after: 4pt, space between lines: 14pt, left indent: 0cm, right indent: 0cm, first line indent: 0cm, left tabs: none, right tabs: cm, centered tabs: cm, decimal tabs: cm, lang: Japanese
</styles>As you can see, the font list is delimited by return, and in each line, we have two fields, separated by a "
:"; the fields are:language
font nameActually, in the current implementation, the Perl converting script supports only four fonts:
English1: Gandhari UnicodeGandhari Unicode is a beautiful Unicode font containing many diacritical characters. The "language" field for it can be either English or French (these are the only languages supported for Roman fonts in the current implementation). You will add "1", "2", "3", etc. in order to distinguish between fonts of the same language.
English2: Gandhari Unicode Italic
English3: Gandhari Unicode Bold
Japanese: Hiragino Mincho Pro W3
ForJapanese: Hiragino Mincho Pro W3, I think no comment is needed.By the way, it would be not difficult to add support of other fonts/languages in the Perl converting script.
Now, the paragraph style list is more complicated. Each paragraph style is separated by a return; each field is separated by a "," (except for the first
paragraph_style_name), and each style contains:Here is another example of real "style template":
<paragraph_style_name>the macro "paragr_tag" adds this name automatically; the user will add manually a "*" at the beginning of the name if it is the default style.font- string. The name of the font to be used for this style.
size- digit. The default size of the font for this style in points.
color- string. none (i.e. black)/red/green/blue.
alignment- string. left/right/centered/justified.
space before- digit, in points.
space after- digit, in points.
space between lines- digit, in points.
left indent- digit, in centimeter. It must be a positive number. --
Left indentandright indentvalues are counted from the left margin, not from the limit of the paper.right indent- digit, in centimeter.
first line indent- digit, in centimeter. For a "hanging indent", the value must be negative (but then, the left indent must be a positive value, equal or greater than the first line indent value). The starting point is the
left indent.left tabs- digit(s), in centimeter (the starting point is the left margin), or "none". If the value is "none", there will be no define tab at all (there will be only default tabs). The default tab width is 720 twips (= 1/2" = 1.27 cm). There may be more than one tab: each tab width must be separated by a ";". Example: 1cm; 4 cm; 6 cm.
right tabs- ditto (except for "none")
centered tabs- ditto
decimal tabs- ditto
language- string. English, French or Japanese.
<font_language>

English1: Gandhari Unicode

English2: Gandhari Unicode Italic

Japanese: Hiragino Mincho Pro W3

</font_language>

<styles>

<Title>: font: Gandhari Unicode, size: 14pt, color: none, alignment: center, space before: 0pt, space after: 6pt, space between lines: 18pt, left indent: 0cm, right indent: 0cm, first line indent:0 cm, left tabs: none, right tabs: cm, centered tabs: cm, decimal tabs: cm, lang: Japanese

<Right>: font: Gandhari Unicode, size:12 pt, color: none, alignment: right, space before: 0pt, space after: 6pt, space between lines: 14pt, left indent: 0cm, right indent: 0cm, first line indent: 0cm, left tabs: none, right tabs: cm, centered tabs: cm, decimal tabs: cm, lang: Japanese

<*Text>: font:Gandhari Unicode , size: 12pt, color: none, alignment: justified, space before: 0pt, space after:4 pt, space between lines: 14pt, left indent: 1cm, right indent: 0cm, first line indent: -1cm, left tabs:  1cm; 4 cm; 6 cm, right tabs: cm, centered tabs: cm, decimal tabs: cm, lang: Japanese

</styles>
A special paragraph style must be added manually if your document contains footnotes or endnotes. It may be for example something like the following:
<Note>: font:Gandhari Unicode, size: 10pt, color: none, alignment:justified, space before:0pt, space after:4pt, space between lines:12pt, left indent: 0cm, right indent:0cm, first line indent: 0cm, left tabs: none, right tabs: cm, centered tabs: cm, decimal tabs: cm, lang:EnglishIt can be added anywhere in the "style template", but perhaps it is a good idea to add it at the end of the other paragraph styles.
Perl script "convert_to_rtf_NWEv2.pl", incorporated
in the AppleScript droplet "convert_to_rtf_NWEv2.app"When all the text is ready in the way I described above, what remains to do is only drag-&-drop the file onto the icon of the AppleScript droplet named "convert_to_rtf_NWEv2.app": the Perl script which is inside it will take care of the real conversion. It will generate in the same folder a new converted file; the file name will be
"your_file_name_conv.rtf"; if there is already a file of that name, a digit, 1, 2, 3, etc. will be added to "_conv". The file will have the icon of Nisus Writer Express. -- But you can open it with other word-processor supporting rtf files with style sheet (especially MS Word, of course).When you edit and save once this file in Nisus Writer Express (or other editor/word-processors), the rtf code will be overwritten and optimized for that application. So it is probably a good idea to do a "Save As...", leaving the converted file as it is.
Download
Download the macro, AppleScript droplet (containing the Perl script) and ReadMe file, from here (64K to download).
I hope this page and the macro/script will be interesting or useful for someone.
Have fun! And please send me your feedback.
Thank you in advance!
Mail to Nobumi Iyanaga
This page was last built with Frontier on a Macintosh on Sat, Jan 15, 2005 at 10:40:46 PM. Thanks for checking it out! Nobumi Iyanaga