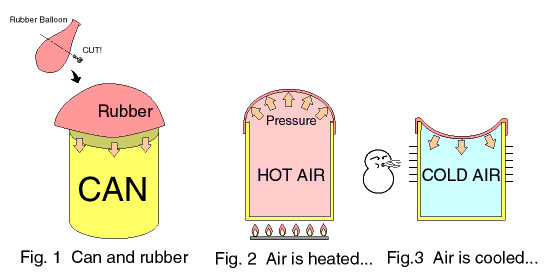
Let's fit a rubber to a can like Figure 1. You can understand easily that the rubber expands when the can is heated (Figure 2), and the rubber contracts when the can is cooled (Figure 3). It is caused that a pressure of the air in the can works to the rubber when the air is heated, shown in allows of Figure 2. Of course, you cannot see the pressure by your eyes.
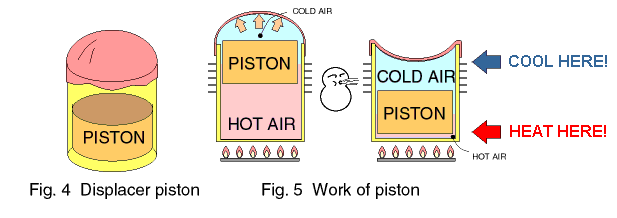
Next, let's put in a piston into the can like Figure 4. A diameter of the piston must be somewhat smaller than that of the can, because the piston works to move (displace) the air up and down in the can. And, please heat the bottom side of the can and cool the upper side of the can. After it has enough temperature difference, move the piston up and down by your hand. When the piston is moved up, the rubber expands because there is a lot of hot air in the can (Figure 5). It corresponds to Figure 2. When the piston is moved down, the rubber contracts because there is a lot of cold air in the can. It corresponds to Figure 3.
In the case of the Stirling engine, this piston, which moves (displaces) the air and make the pressure changes is called a displacer piston.
Do you understand about the characteristics of the air and the work of the displacer piston? They are very important to understand how does the Stirling engine work.
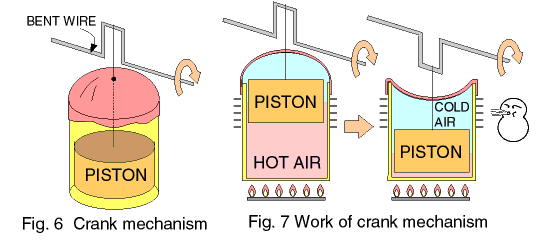
First, connect from the piston and a bent wire with a thread like Figure 6. When the bent wire is rotated, the piston is moved up and down. This is called a crank mechanism.
Please heat the bottom side of the can and cool the upper side of the can, similar to above description. When your hand rotates the bent wire, the piston is moved up and down, and the rubber expands and contracts repeatedly (Figure 7).
The Stirling engine converts from the motion of the rubber to the rotation of the bent wire. Please connect from the rubber to the bent wire with a rod. In this time, a force of the rubber (expansion and contraction) has to be the direction, which rotates the bent wire. In short, you must bend the bent wire the just right angle (90 degrees) from the piston like Figure 8 and 9.

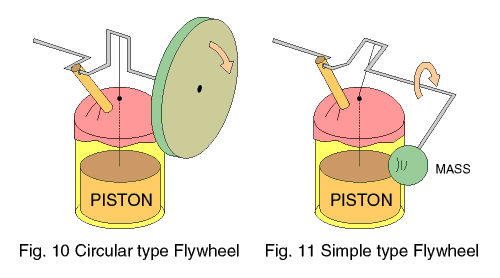
This engine has not worked yet. If you try to work this engine (Figure 8 and 9), the rubber keeps the most expansion or contraction. In order to rotate smoothly and repeatedly, you must fit a rotated mass with the bent wire. It is called a flywheel.
Generally, the flywheel is circular like Figure 10. But at this point, please bend the end of the bent wire, and fit a mass at the edge of the wire like Figure 11. The mass works as the flywheel and to be balanced to the weight of the piston. So, you must fit the mass against the piston.
Finally, the Stirling engine is completed.
P.S.: When the Stirling engine is understood, it is important that the knowledge of the characteristics of air (Thermodynamics), the crank mechanism and the flywheel (Mechanics and Mechanical Vibrations). I have tried to explain about them as simply as possible. Please contact me if you find incomprehensible contents or any errors, and have any your opinions. I hope that this description becomes more suitable for every young student. Permission is hereby granted, by author, to print and distribute this description. Thank you.
Koichi Hirata (khirata@gem.bekkoame.ne.jp)
 Go to Stirling Engine Home Page